Step 1
Understand what a tank type is for.
A tank type holds your panel's measurements and rules: the panel size, its thickness, how many bolts go on an edge, and which materials you use.
Every calculation in WaterForm rests on a tank type. The panel, bolt and gasket counts, the sheet thicknesses and the drawings all come from the values of the selected type.
You define one type for each product built on a different panel. One or two types are enough for most companies.
Step 2
Choose how to start from the empty screen.
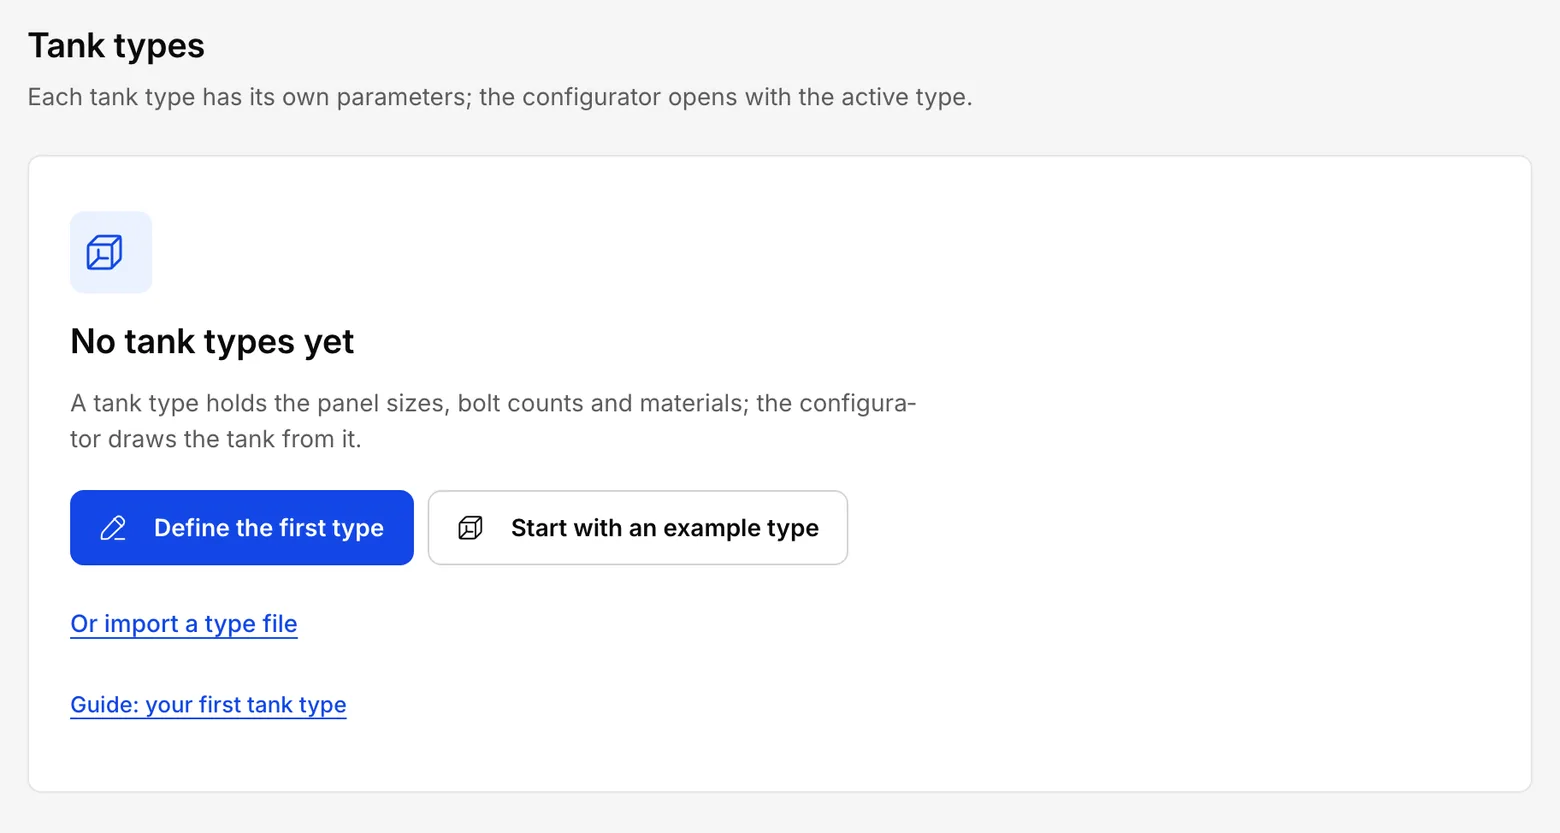
A new company has no tank types. When you open the configurator, or ‘Tank types’ in Settings, you see the heading ‘No tank types yet’ and two buttons: ‘Define the first type’ and ‘Start with an example type’. Without the ‘Catalogue’ permission you see a line telling you to ask your company administrator instead.
‘Start with an example type’ adds a type with ready-made values, which is handy for trying the program out. In the tank types list it carries an ‘Example’ badge until you change one of its parameters and save.
For real work, define a type with your own panel's values: press ‘Define the first type’.
Before you begin, have your panel's technical drawing to hand. Every measurement the wizard asks for is on it.
What you should see
The wizard opens at its first step.
Step 3
Step 1: give the type a name and choose its shape.
In ‘Type name’, type a name you will recognise, such as the name in your product catalogue. It appears in the ‘Tank type’ list in the configurator and on the drawings.
Under ‘Shape’, choose ‘Rectangular’, ‘GRP’ or ‘Cylindrical’; a shape your company's package does not include is not offered. The wizard has seven steps for a rectangular type and five for a cylindrical or GRP one. This guide follows the most common, the rectangular type.
Then press ‘Next’.
Step 4
Step 2: enter your panel's measurements.
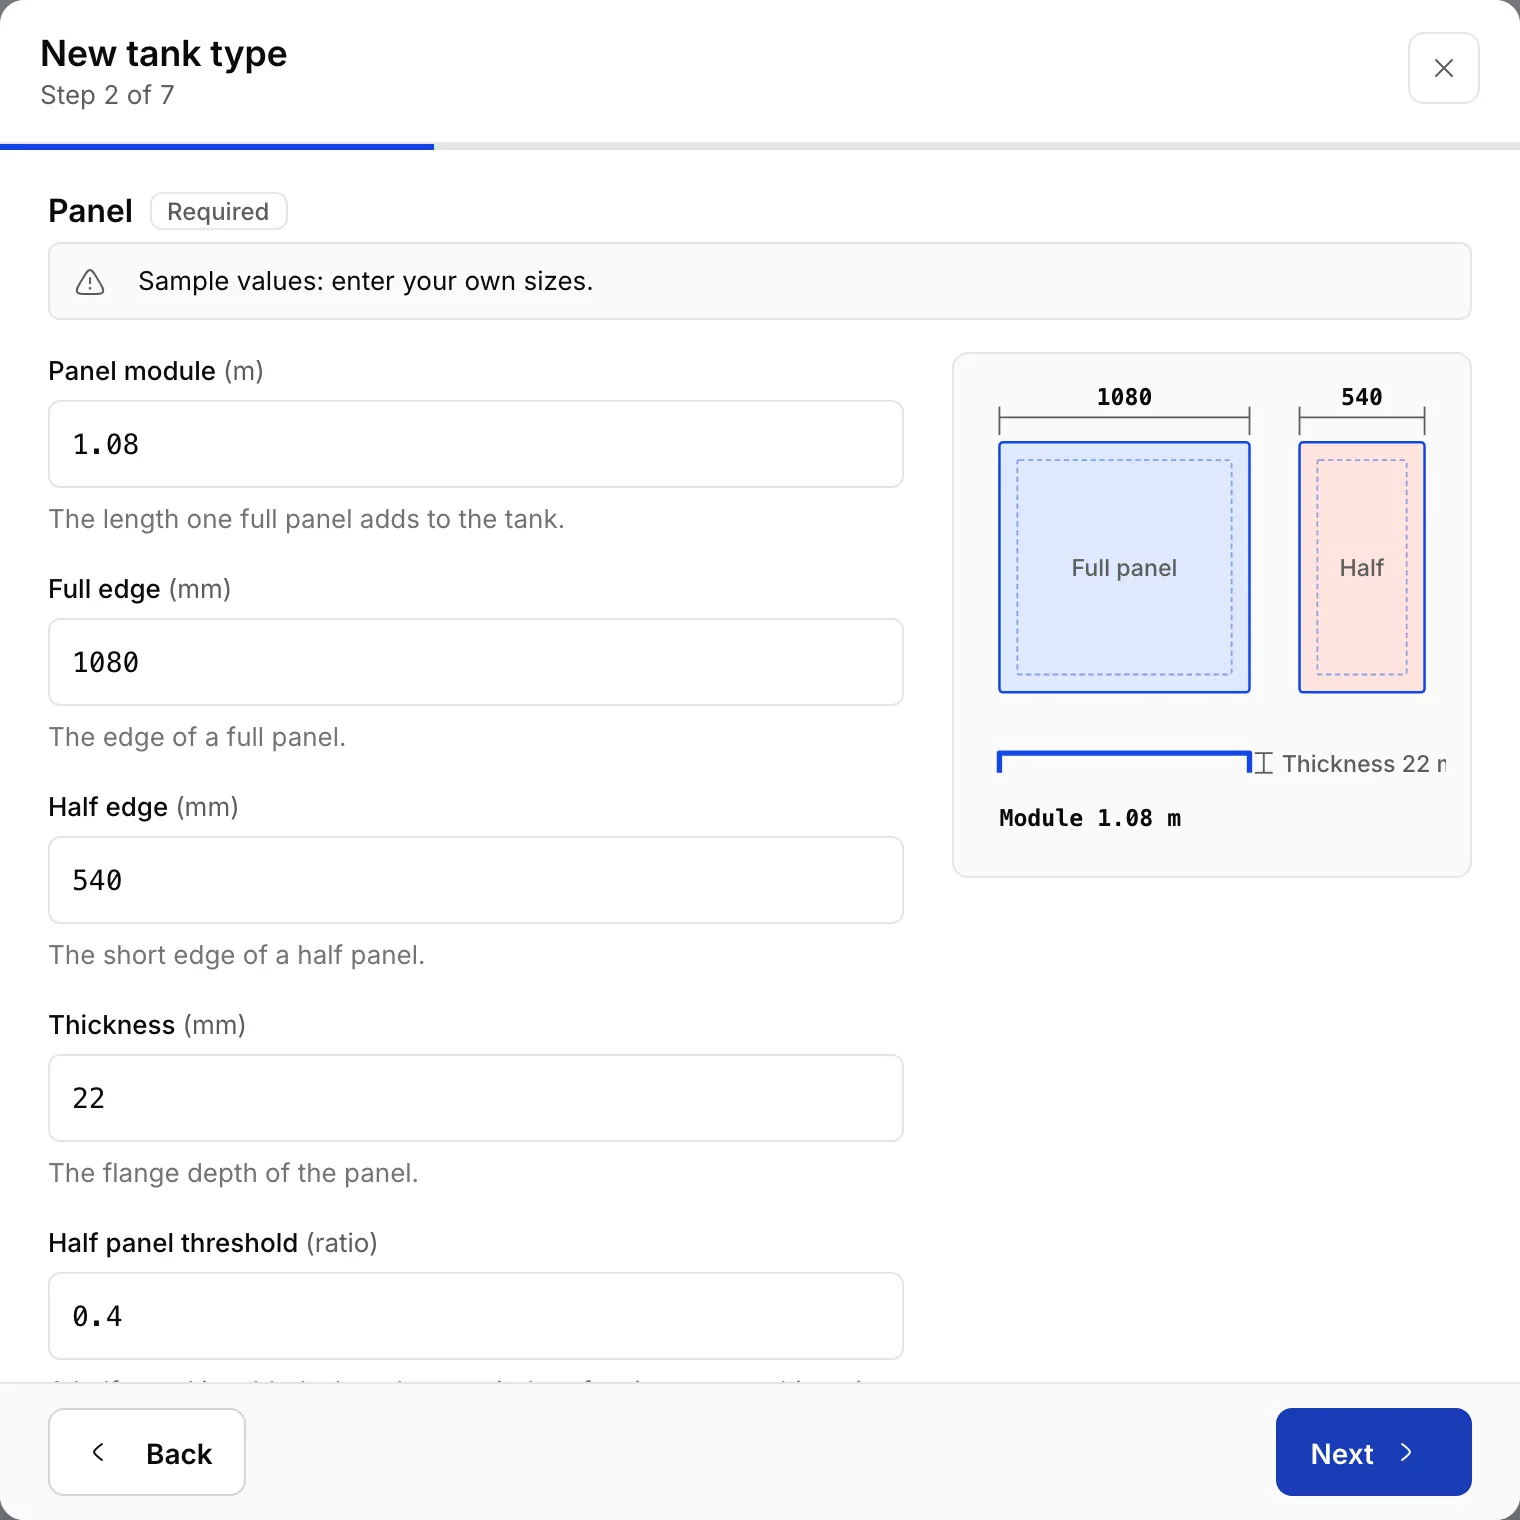
Every value in this step is on your panel's technical drawing. The numbers the wizard shows are examples; if your panel differs, change them.
‘Panel module’: the length one full panel adds to the tank, in metres, for example 1.08. The tank's dimensions are turned into metres with this value.
‘Full edge’: the edge of a full panel in millimetres, for example 1080. ‘Half edge’: the short edge of a half panel, for example 540. ‘Thickness’: the flange depth of the panel in millimetres, for example 22.
‘Half panel threshold’: when a dimension does not come out in whole panels, a half panel is used if the remainder is this value or more. The example is 0.4; leave it if you are unsure.
Step 5
Step 3: choose the panel materials you use.
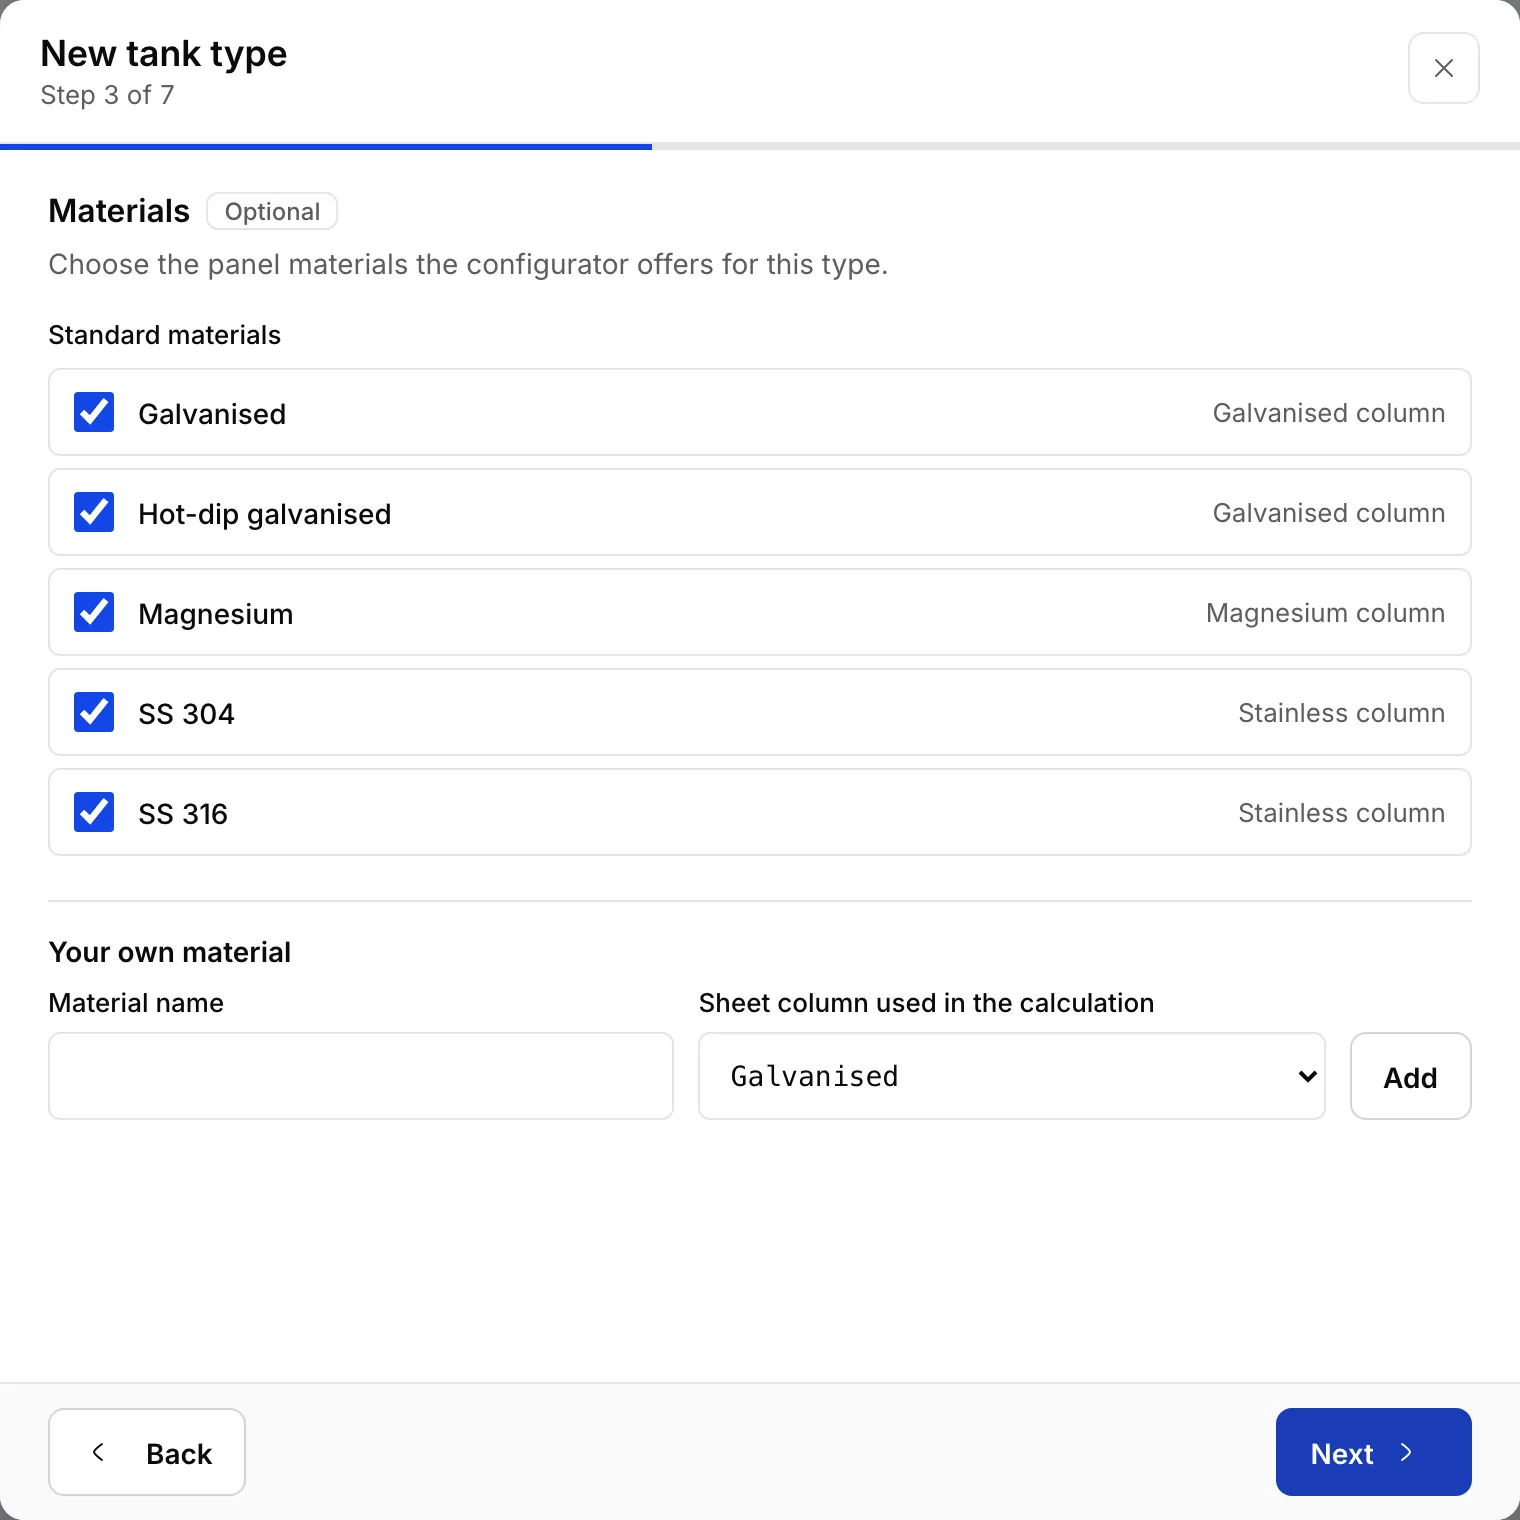
The ‘Standard materials’ list holds galvanised, hot-dip galvanised, magnesium, SS 304 and SS 316. Leave the ones you make ticked and untick the rest. At least one must stay ticked.
If you use a material that is not on the list, add it under ‘Your own material’: type its name in ‘Material name’, choose stainless, galvanised or magnesium in ‘Sheet column used in the calculation’ and press ‘Add’. The calculation reads that material's sheet thickness from that column.
The materials you choose here are the ones in the configurator's ‘Panel material’ list. A GRP type skips this step, because every panel of a GRP tank is GRP.
Step 6
Step 4: enter how many bolts go on each edge.
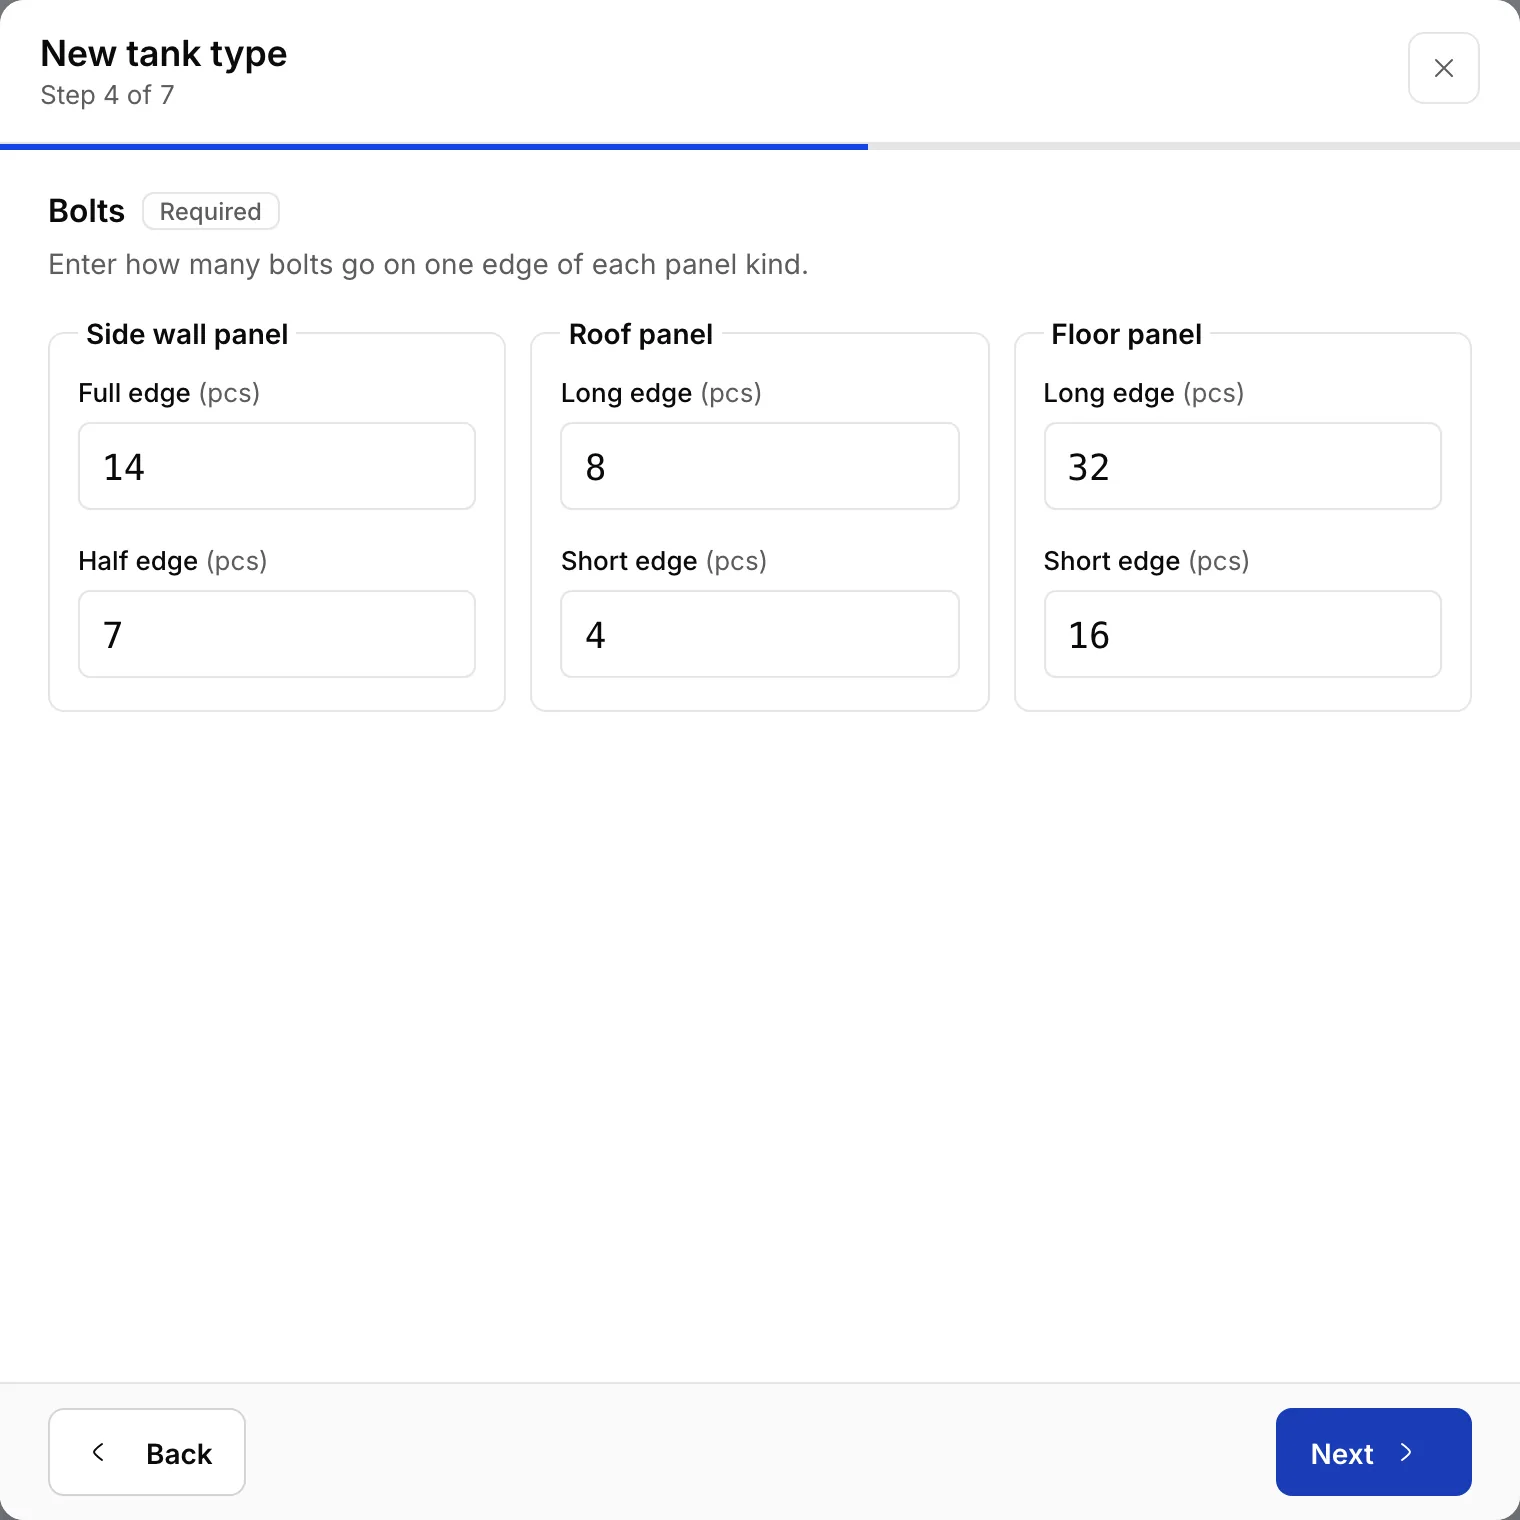
This step has three groups of boxes: ‘Side wall panel’, ‘Roof panel’ and ‘Floor panel’. The side wall panel has ‘Full edge’ and ‘Half edge’; the roof and floor panels have ‘Long edge’ and ‘Short edge’.
In each box, type how many bolts that edge of that panel takes: on the side wall, for example, 14 on a 1080 mm full edge and 7 on a 540 mm half edge. Take the number from the holes on your panel drawing.
These numbers directly set the bolt count of the side wall seams and of the roof and floor joints.
Steps 1, 2 and 4 are required. You can fill in the others later.
Step 7
Step 5: confirm the connection sizes.
This step shows the standard table of connection sizes: DN15 to DN200, each with the ‘Radius (mm)’ the configurator draws.
Most companies take the table as it is. You can change a radius, or add a size by filling in ‘New DN’ and ‘Radius (mm)’ and pressing ‘Add a row’. A standard size you never use is deleted later, under ‘Type parameters’.
When you choose a size for a connection in the configurator, the sizes in this table are the ones listed.
Step 8
Step 6: enter the sheet thicknesses now or later.
The sheet thickness table holds, for each height you choose in ‘Tank height’, the thickness of the floor sheet, each tier's side sheet and the roof sheet in millimetres. Its columns are stainless, galvanised and magnesium.
This step is optional. If you leave the table empty the type is still saved, and in the ‘Tank types’ list the type shows ‘Missing: sheet thicknesses’. Pressing those words opens the table.
You fill the table in later under ‘Type parameters’ in Settings, on the ‘Sheet thicknesses’ tab. The guide on type parameters shows how.
Step 9
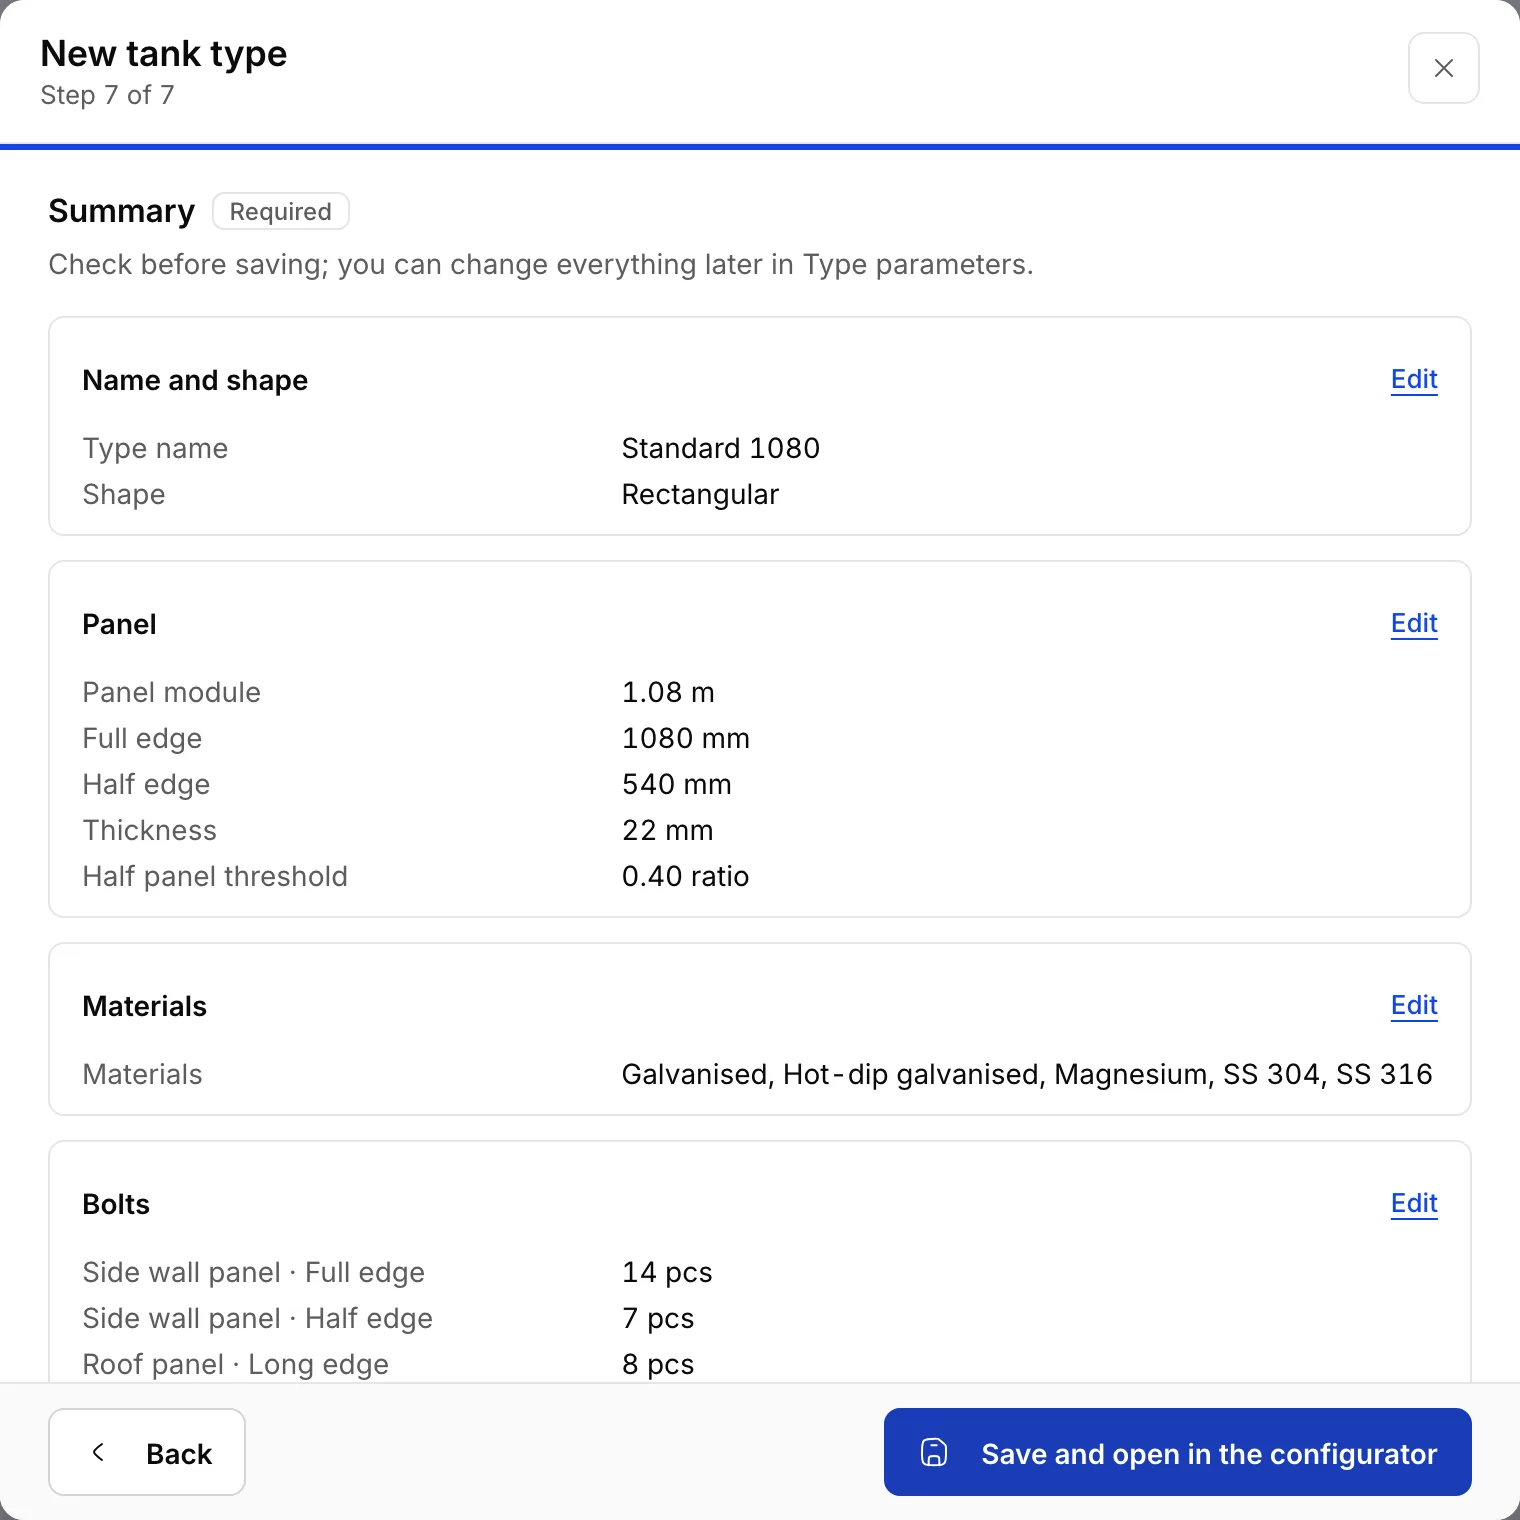
Step 7: check the summary and save.
The last step, ‘Summary’, shows everything you entered on one page. Compare the numbers with your panel drawing once more. If a value is wrong, go back to its step with that part's ‘Edit’ link or with ‘Back’.
When everything is right, press ‘Save and open in the configurator’.
What you should see
The configurator opens with your new type. Under the ‘Tank type’ card it shows your values, such as ‘Panel 1080 mm, 14 bolts on a full edge, 7 on a half edge.’
Step 10
Export or import a type as a file.
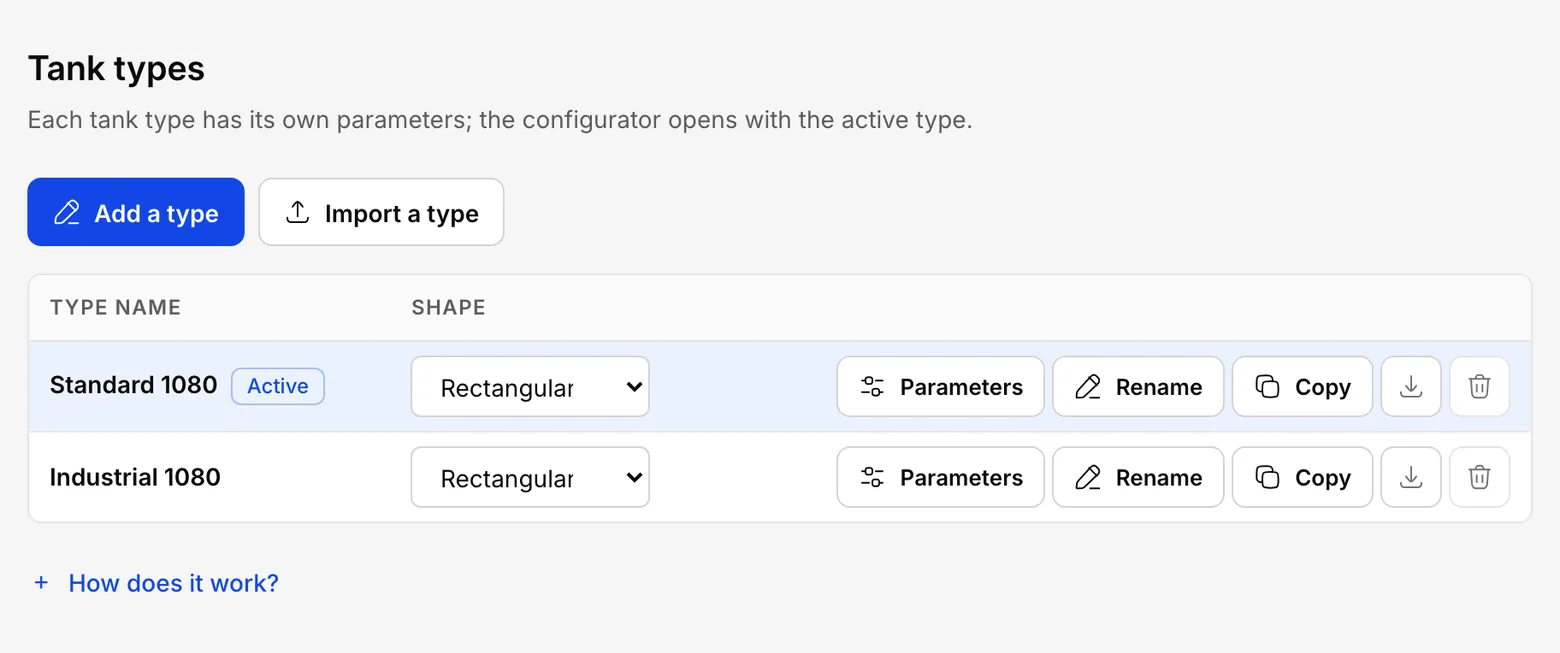
To send a type to another WaterForm installation, or to keep a copy, open ‘Tank types’ in Settings and press the download icon at the end of the type's row; pointing at it shows ‘Export (.json)’. The file lands in your Downloads folder.
You can e-mail the file to a colleague. They press ‘Import a type’ above the list in the same section of their installation, choose the file and answer ‘Add’ when the program asks. If a type of that name exists, the new one is added under another name.
This file carries that one type only. To move your whole catalogue, use the ‘Data transfer’ section.
What you should see
The imported type appears in the tank types list under its own name.
Stuck somewhere? Write to us and we will try to answer the same day: contact@fabrikode.com